Marlin Firearms Forum banner

Rossi 92 - Cartridges Jamming

19K views 20 replies 11 participants last post by  94win30wcf  
#1 ·
Well this weekend, after a couple weeks of looking at various lever actions at shops and on the net, I finally picked up a Rossi R92 .357 Mag in the octogon 24 inch barrel. Since I love to reload I also got the dies, primers and bullets to reload my own cartidges. I had done my homework and had read that the action can be hit or miss. I have never reloaded .357, but I followed the Lyman's manual to the tee and made sure the cartridge was the proper OAL and crimped properly. After a thorough cleaning of the bore and lubricating the action, I loaded up my nice new reloads.:shot: The first bullet jammed half way up in the cartridge guides. :( It wasn't too hard to reach in there with my finger and nudge the cartridge forward a little, but it would not load until it was up through the guide slots for the rim of the cartridge. Keep in mind I made sure my reloads were to specs, but I checked them again with calipers and they were right on the money if not just .005 shorter.

I thought maybe I should lubricate again and pump the action some. So taking 5 minutes or so, I just pumped the action 50-100 times and put 10 cartridges in the magazine. I got ten in there, just barely, even though I had read these 24 inch long rifles will hold 13 cartridges(guess that magazine spring will need some attention.) I tried to cycle the gun. It did better this time and some needed a little jiggling and some needed help up through the guides. Overall, I was somewhat disapointed. I have an old Marlin 1894 in 25-20(which I just love) made back around 1910 and it takes just about any cartridge I reload as long as it is not too long and not to short. It loves the cartridges I reload with an old Vintage Marlin Ideal tool. But alas the barrel was never taken care of by previous owners and it is pretty finicky about the bullets going though it and will tumble a cast lead bullet after shooting 20-30 rounds. It loves jacketed bullets.

Soooo..... I have ordered a do-it-yourself video with a new spring and follower from StevesGunz.com and have read just about everything I can find on the net to disasemble the R92. It looks a little intimidating compared to the brilliant simplicity of the Marlin 1894. But I am confident I can take it apart and get it back together.

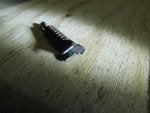
Upon closer inspection I can see some pretty nasty burrs on the edge of ejector face, which is pretty shocking. I can't believe how stiff the spring is on that thing. The trigger and lever plunger aren't so bad, but I might just adjust them a little when I get this thing apart and smoothed out.

Anyhow, will a lighter ejector spring and cleaning burrs solve my problem? As I said most of my reloads(about 70%) would cycle right through, but if I slowed down at all as I cycled though with the lever the cartridge jams half way up through the guides. Any other suggestions from you Rossi gurrus?

Haven't even shot it yet, but from what I have read it is supposed to be accurate and fun to shoot, which is why I bought it so I can semi-retire my vintage Marlin 1894 25-20. One more question... Is there anything I need to do to properly break in the barrel?

Matthew
Utah
 
#2 ·
Hey Matthew, sorry to hear about the problems with your Rossi. Normally they work fine, but are stiff. The Steve's Gunz spring will not fix the problem. All it will do is make it easier to close the lever when you chamber a round. If you cycle the action you will notice that the last 1/4" of closing the lever is a bit stiff. The Steve's spring makes it easier to close the lever, you don't feel that stiffness at the end, it's more of a smooth feeling.

There may be burrs on the cartridge guides which could cause your problem. Before you do any tinkering, take it out and shoot about 100 rounds of FACTORY ammo. This would serve to wear the parts in a little. Many times just shooting a gun a bit will work the bugs out. After you shoot the 100 rounds, then try your reloads. There may be some little thing with the reloads that is causing a problem. With a little bit of break-in, they may work.

Here's a tip on reassembly. When you get ready to install the bolt, ejector and spring, place an empty cartridge case on the front of the bolt, under the extractor. This will will serve to hold the parts in alignment so you can install the bolt stop pin. Slide the bolt in until the case starts to enter the chamber, then you can align the ejector with the holes in the receiver to install the pin.

Good luck, let us know how it works out.
 
#3 ·
Doc,

Thanks for the tip. Any suggestion on the best Factory ammo? I plan on taking it to the range in the next few days. I'd like to remove that burr first though so I may have it apart tonight. :)

I'll try to get a good photo of the burr on the ejector and post it on this thread. It is actually a pretty nasty one right on the left side of the ejector. I didn't see any burrs on the cartridge guides, but there may be some that I can't see from an inspection from the top of the receiver.

So on the Steve's kit, is that an ejector spring or the Lever spring? The kit never said. I was just planning on snipping the lever spring a little to loosen it up. It actually isn't too bad. I think I will leave the trigger the way it is, since I will be letting my sons shoot it and I would rather have a stiffer trigger than a hair trigger. The hammer seems fine, but maybe I need to loosen it up a little. I definitely need to do something about the magazine spring. After about 8 cartridges it gets really hard to load any more.

I want to get some opinions about relining my old Marlin 25-20, but I think I will post another thread about that.

Matthew
Utah
 
#4 ·
Any factory ammo is fine, whatever is cheapest. Winchester, Remington, etc.

The Steve's kit comes with the ejector spring. The factory spring is way too stiff. Brownell's carries the Gunslinger spring kit, it has all the springs needed, just keep the factory trigger spring. Rossi 92 Spring Kit : GUNSLINGER RIFLE SPRING KITS - Brownells

You can trim the magazine spring to reduce the tension, it is probably longer than really necessary.
 
#6 ·
Mine has had quite a bit of shaping up under my own hands. The first thing Steve will show you is to take the butt stock off and get some brake cleaner. Spray that junk from production down the barrel. He really goes after it for a good bit of time. Then sprays an oil of your choice following up. Its amazing how helpful that is. Obviously all you do is to reassemble the buttstock. May be a place to start.

This video is actually a pretty good second to the Steve's Gunz video!

 
#7 ·
Doc,

Well I got home tonight and started in on the Rossi 92. I watched Prokity's Gunslinger Sping Kit installation video several times the other night and got some other instructions. Those tips helped a lot. I got it all apart pretty well. The tang was a bear to get off though. Prokity's tip on using the lever pin as a dummy pin really helped things go back together. Well I had it apart 3 times tonight and whittled off quite a bit of time getting it back together the third time.

Here's what I did. The first thing was to clean the burr off the ejecter. I promised a photo.


As you can see on the right side of this ejecter there is a big nasty burr. I slicked that up with a fine diamond grinder on my lapidary cab grinder. :) And then lapped all the sharp burrs and edges on my diamon knife hone. I fitted it several times and made sure it moved freely and fit well.

This isn't a great picture, but as you can see the burr in gone. Nice and smooth.


Next, I cleaned burrs off the breach bolt where it slides inside the reciever. I did a little honing on the tang where it slides into the reciever, just so it went back together easier. I took it apart again for good measure and had it back together pretty quickly. I honed the breach locks a little and oiled it with some 3-1 oil.

I got it all back together and was somewhat disappointed since still was jamming. A closer inspection of how the cartridge was entering the chamber up though the guides gave me an idea. So I took it apart a third time. This time I took out the guides and inspected them. I could see that the guide grooves had been polished at the factory, but only to a certain degree, but not to my satisfaction. So with a fine file and a tiny dremel bit and some diamond polish on my lapidary wheel I had the grooves looking much better and highly polished. I got a little confussed on the stop spring, but with a quick search on the web I figured out how to put the stop spring in properly and had it all assembled again.

The improvement was substancial! This time not one cartridge got jammed and only a couple out of twenty rounds cycled needed a little coaxing by wiggling the lever a couple times.

I think I will order a set of the guides and slick them up and keep my originals as back up. Has anyone else done this before, where you polished up the slots in the guides?

Can't wait to get Steve's video, spring and steel follower.

Oh, the last thing I did was snip off about 3 inches of the magazine spring. I measured it so it was 3 cartridges longer than the magazine(as suggested in some other instruction) and snipped it. Much better on my fingers for the last couple of rounds. Now the next project will be to fix the loading hole on the reciever. Any suggestions?

Matthew
 

Attachments

#8 ·
Good work! Mine when taken apart showed that the left guide had been placed correctly, but the little spring was in the wrong place. It was a jammomatic as well. Placing it according to spec made things work much better. Steve emphasizes proper placement on this spring. There are several points that Steve removes metal, though I'm not sure just how much more I need. I replaced that ejector spring, cleaned under the extractor (so much grime it wouldn't grasp a 45 case) from its unnatural elevation, and my gun is slick as snot on a frogs back. The major thing I did was to remove the two constrictions in my barrel. I have a 45 Octagonal, which I love, but had a rough nasty bore that was not conducive to good accuracy out of lead bullets. It was fine with jacketed, but I don't shoot much of that. I firelapped it with 56 lapping loads, and its suprising me with its accuracy and most cast loads.

Let us know how it shoots!
 
#9 ·
Howdy all,

I learned some new things about my Rossi R92 357 tonight regarding cartridges jamming and so I am sharing what I learned.

1. This rifle does not like the full length 357 cartridges. For example most of the reload data suggest an OAL of 1.590 for the 357 mags.(see the authoritative WIKI as well .357 Magnum - Wikipedia, the free encyclopedia) Well those just don't agree with my Rossi 92.

2. I reloaded a couple different bullets tonight. A cast 125 gr RNFP and a 158 gr jacketed RNHP. I loaded up 10 of the 125 grain bullets and noticed that the crimp ring was pretty short. I looked up 38 Special data and the OAL was about the same, so I finished them up and tried them out. After all this is made to chamber a 38 Special(.38 Special - Wikipedia, the free encyclopedia) and a 357 Mag. WOW! They are slick and smooth. The OAL on those is 1.55(the spec OAL for a .38 Special) and they just fly through there with no problem at all. That sure made me feel good. I did something right.

3. The 158 gr bullet has a crimp groove that allowed me to crimp it right at 1.590 so I did that, because that is what the book says. I was sorely disapointed when I tried loading them. I only got one try and the bullett jammed right in the middle of the cartridge guides as the nose was entering the chamber. This is no good I thought. I had to unscrew the magazine spring and poured them out. I set the die a little lower and crimped them all to 1.55 inches which was right at the top of the crimp groove and the same length as the 125 grain bullets. I tried again and they cycled right though. Ta da!

The bullets I was having problems with first are a cast FN 105 gr and they were all 1.590 OAL or just a tad shorter around 1.585 so I shortened them as far as I could on the crimp groove to 1.570 - 1.575. Now they cycle through with no problem.

So here is some solutions for you Rossi R92 owners who have some jamming problems. Find a cartridge that cycles through well. Take a measurement of the OAL and observe the contour of the tip of the bullet and stick with those. I have read that some guys have good luck with a 38 Special and not so much with a 357 Mag. I am working on the problem and I think I have a sollution. The cartridges guides, both left and right, have a little groove that guides the rim of the cartridge up as the bolt engages it. The problem, as I see it, is it is not wide enough to accomodate the bullet as it is angled up and starts to enter the chamber. Just as the tip of the bullet enters the chamber the rim is sliding though those grooves. If the bullet tip hits the top of the chamber and the rim has not cleared the grooved or it is to tight and can't manuever through, you get a jam. With the full length jacketed bullets I could not even coax them up with my finger. I think the guides grooves are the problem and need some minor adjustments.

So I am going to get me a spare set of guides and adjust the grove a little. I think if I take a little off the front and back of the rim guide groove(I am not sure the techinical terminalogy for the anatomy of that part, but it sounds good to me) and then polish is up and try a variety of cartridges in it. I'll let you know what I discover.

Has anyone else discovered the same thing? I am really interested in knowing.

I still haven't had a chance to shoot this puppy. Oh well. After I get her all tuned up I am going to work on the wood finish.

Matthew
 
#11 ·
I have A new rossi in .45 Colt. Planning to smooth it up sometime in the future but want to do some shooting first. It feeds and functions well as is. Have not got to shoot paper yet but it has killed some dirt clods and such well. Looking forward to reading more about yours.
 
#12 ·
Well fellers,

I finally got out to the range to shoot the new Rossi 357. Went to the pistol range and set up at 50 yeards. Now I ain't no Jesse Whales, but I try.
These are the three rounds that I reloaded. Shot 10 of each tonight.
1. 105 gr LFN - 5 gr trail boss OAL 1.575
2. 125 gr LRNFP - 5 gr Trail Boss OAL 1.55 (this is the OAL for a 38 Special)
3. 158 gr jacketed HP - 15 gr IMR4227 OAL 1.55

Loading observations...
#1 still had problems loading smoothly
#2 slick as a whistle
#3 just like butter on a griddle

I shot 6 groups of 5 rounds. I got better as I went, but practice makes perfect. Need to find a shooting pardner to give me some tips.

Here is a photo of my targets. Nothing to brag about, but thought I would share. Everyone likes pictures.


Matthew
 
#13 · (Edited)
May not be relevant to the OP's situation, but when I tuned my Rossi 92 .357 I beveled the bottom edge of the chamber where case mouths were hanging up. I was conservative in removing only a small amount of metal, and if I had it to do again I might take off a tad more.

I consulted with Steve before doing this, and I measured the a case head, and found at least .1" of solid brass in the head, so strength isn't compromised by the bevel.

Oh yeah, don't let anybody tell you them furrin guns won't shoot. Five rounds of .357 at 100 yards, just over 1". Honesty and my background in science compel me to note that this is probably a statistical fluke, as are most single great groups, but this rifle is good for an honest 2" at 100 yards if I do my part.


Image
 
#15 ·
OK, here goes. I'm not much of a photographer and this camera has been acting up lately, but this shot should give a pic of the chamber. Note that it hasn't been cleaned since I last fired the rifle, but it does show the edge.

Although not part of his video instructions, Steve endorsed this during a phone conversation, and pointed out that there is plenty of metal in the head of the cartridge. He also mentioned, either on the phone or his video, that feeding of pistol cartridges in a lever rifle is similar to auto pistols, with some of the same mechanical challenges. Makes sense.

I have to say that doing this bevel was hard on this old man's nerves. Not a place where you want to screw up. The "bridge" of metal across the rear of the action presents an obstacle, as you have to approach the chamber either above or below it. I used a "tree" or cone shaped rubber abrasive in a Dremel tool with an extension. I held my breath and worked carefully with the Dremel on low RPMs. Even something as mildly abrasive as the impregated rubber piece cuts fairly aggressively, so you have to be really steady and careful. My wife held a flashlight and provided moral support. Like I said, I went conservative, and it still hiccups a bit with certain loads, but it is much better. It could probably have stood losing a bit more of the edge, so maybe another time. Obvious factors affecting feeding include the degree of crimp and geometry of the bullet, as well as seating depth . The greater the crimp the less "lip" to hang up.

Anyhow, it worked for me. YMMV, as the saying goes.

Paul

Image
 
#16 ·
Paul,

Thanks for posting the photo. Yesterday my son and I practiced on an old bolt action 22 that was having loading issues and the problem is solved on that one. When I get up the nerve I will do the same thing on the Rossi 92. I have a Winchester 9422 that clips off little slivers of the 22 rounds. I know there is a similar issue with it and it needs something done to it.
 
#17 ·
I would be very hesitant to remove metal from a .22 rf chamber. Unlike the .357 that has a good .1" or so of solid brass in the case head, the RF case is very thin and needs full support. Don't underestimate the pressures that tiny round generates either. I've had a couple of rims blow out, and it's a bit exciting. Definitely gets your attention. A good reason to always wear glasses too.

Paul
 
#18 ·
I followed the video to replace springs on my Rossi .357 carbine. I used a Brownell springset. Mostly things went smoothly although I battled to align the lower tang and hammer assembly.

Two queries on which I would welcome comment:

1. The only spring I did not change is the spring in the lever - it looks as if the retaining pin should be tapped out from left to right (muzzle pointing away) but I could not shift it. I then tried to tap it out in the other direction, also without result. I am reluctant to really force it for fear of damaging the lever.

2. I found that the new trigger spring gave a dangerously light trigger pressure, I have tried setting the spring slightly back from the securing bolt but it made no difference. With the new spring I also get occasional "hammer follow" in which the hammer follows the bolt down after cycling the action. Please, no-one tell me to ensure that I cycle the action firmly to either end of its stroke - first thing I checked!
 
#19 ·
Before i got into marlins i shot a metric ton of Rossi's. mostly in .45c. and i will tell you they really are great guns.sometimes they can be finicky but they do a good job. Steve at Stevesgunz is a hell of a guy and his video is really informative. with a little patience they can be slicked up real nice and shoot really well, i hope you guys have good luck with them and to me tinkering with them is most of the fun.
 
#20 ·
I found this forum with a search on my Rossi 92 .357 jamming and was reading on what you guys were doing.Well I want to thank you guys for your post on this and it has really helped me.I done a little polishing the internals but the biggest help was changing that ejector spring.Man now it cycles .357's slick as a whistle.I am a happy little boy even tho I will be 66 in two more days.My toy is broke no longer and I am having fun.Now if this dang rain will quit so I can go outside and play!!!